

Are you getting ready to have shoulder surgery, and your doctor has told you to keep your arm in a sling for approximately 5-6 weeks?
Then, you realize that you will be spending a lot of time in your recliner, but you suddenly notice that you have a manual recliner! So, you cannot operate the right lever to raise the footrest so you can lean back comfortably because it’s too far to reach the right side lever with your left hand.
In order to figure out this situation about how to adapt a recliner for right arm surgery, I researched a lot on the web, and I did find out that there are some ways that you can switch the handles and there are some instructions, but they don’t look very clear. They are also very tricky, so if you try yourself without professional help, you can get in trouble by making things messier.
So, I will first tell you about a DIY hack you can apply instantly without any technical knowledge. However, if that doesn’t work for you, I will describe the other fixes I found online and gathered them in this article.
Table of Contents
How to adapt a recliner for right Arm surgery
DIY Way To Adapt The Manual Recliner For Right Arm Surgery
Step #1: (Examine PVC Fits Lever Properly)
The first step is to ensure that the lever on the right side fits tightly into the PVC pipe hole. If they do, we will continue building the gadget.
Otherwise, wrap the right side liver in the sports foam or tape, or you can also use the duct tape inside the PVC pipe according to the amount necessary for proper fitting between the pipe and the recliner lever.
Step #2: (Gluing And PVC Joint Usage)
After ensuring that they fit correctly, then in step 2 you attach the 2 PVC pipes together by using a PVC joint and gluing them properly or using plastic tape to ensure they stay attached.
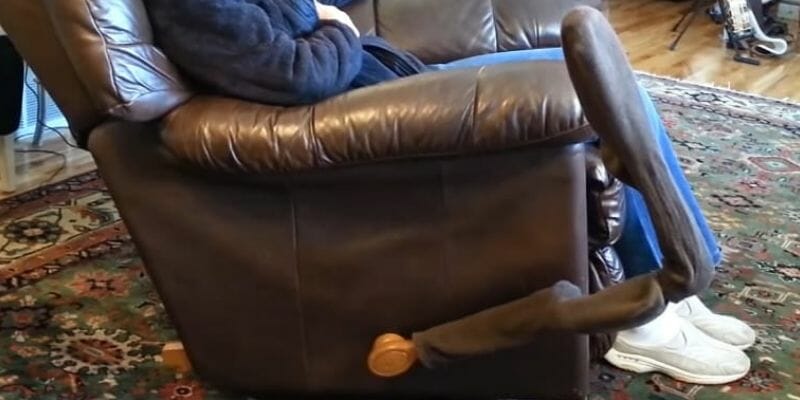
Step #3: (Connecting and Making Extended Lever)
As shown in the picture above, you have to attach the PVC pipes in a way that lets you easily use them with your left arm after having shoulder surgery.
Step #4: (Cover The Extended Lever)
If you want to hide the PVC pipes if they appear unpleasant, you can use clothes or socks, depending on your preference, for covering the PVC to make them look more creative and appealing.
For a more realistic look, use spray paint that is similar to the color of your recliner.
Final Remarks
This simple DIY trick on how to adapt a manual recliner for right arm surgery is much better than all the other alternatives that I have explained below. This is because they are a lot more tricky.
In simple words, you might say this gadget is a simple solution to the short-term problem that lets you adapt recliner’s lever following shoulder surgery.
If you want to know (how to properly sleep in your recliner after shoulder surgery, click here) or if you want to know (which recliner is the best after shoulder surgery, click here).
Check out the video below for a better understanding of the process!
2nd Method On How To Adapt Manual Recliners
Below is another way to adapt a traditional recliner chair for right arm surgery; however, this can be tricky. It would be best to manage with the earlier technique to make it a temporary fix.
As for this method, I would recommend taking professional furniture repair services to avoid any wrong steps that may damage the lever mechanism of your recliner while shifting it from right to left.
- Step 1: To switch the handle from right to left, you have to turn the chair upside down.
- Step 2: Then run the short square tube and the handle part through the other side.
- Step 3: It may require some drilling and some other adjustments. But it can certainly be done.
Final Remarks
After the surgery, you need to adjust the recliner for some time. Therefore, drilling holes in the fabric of the recliner and cutting it will look worse than the PVC method.
How To Adapt A Power Recliner For Right Arm Surgery?
Power lift recliners use electricity to move or actuate the chair. These chairs have many functions, but all of them can be operated by two buttons on the right side of the chair. The buttons are hooked up to internal circuits.
Using a bit of know-how, you may be able to temporarily move the control buttons to the left and then reconnect them after your arm has recovered.
Step #1: (Unplug the power source)
Firstly, unplug the recliner power source. In this way, you will be sure no one will be shocked by the electrical current, and you will be safe.
Step #2: (Remove the Buttons)
In step two, remove the buttons connected to the right side of the chair; be careful not to damage the marks on the buttons. It would be best if you wrote down the purpose of each button on a piece of paper so that you can remember it when reassembling the device.
Step #3: (Cut the wires)
To adjust the recliner’s control to the left:
- Measure the width of the chair’s seat with a measuring tape. This will help you determine how much wire to shift the control to the left side.
- Cut the wire with the wire strippers.
- Remove a small section of each end of the wire for insulation.
Step #4: (Solder the Wires)
You’ll need to heat the soldering iron by connecting it to a power supply. Once it’s hot enough, you will need to carefully attach one end of the wire to the circuit under the exposed button and the other end to the Veroboard. For best results, use different colored wires for different buttons. Likewise, you should avoid shorting the wires when soldering.
Step #5: (Complete the Circuit)
Attach the removed buttons to the Veroboard, and then use double-sided tape to adhere them to the board. Lastly, to provide power to the board and the buttons, attach two wires from the battery pack to the Veroboard. Make sure all the wires coming out of the battery pack are covered. This is a safety measure that can help prevent your device from malfunctioning.
Step #6: (Attach the Veroboard)
The sixth step (attach the Veroboard) involves using a hacksaw to cut off the parts you don’t need. Next, tape the compact Veroboard on the left side of the recliner, making sure it is placed on a comfortable side for someone who has had arm surgery.
Step #7: (Turn On the Power)
Make sure that the circuit is working properly by plugging the recliner into a power source and turning it on.
FAQs
Is It Expensive to Adapt Recliners for Right Arm Surgery?
Adapting recliners for right arm surgery is a relatively simple and inexpensive process. Power recliners require a greater amount of electronic replacement, whereas traditional ones require a more mechanical approach.
Does Adapting a Recliner Mean It Has to Be Permanently Modified?
In order to adapt your recliner for right-hand surgery, you need to make a few simple and temporary additions. Once your right hand has recovered, the additional circuitry or hardware can be removed to restore the recliner to its original condition.
Is it possible to get recliners with left-Arm controls?
You can get recliners with left-hand controls by placing an order for custom-made recliners to fit your body weight and your right-hand surgery situation. This can take up to 4-6 weeks to get delivered as no manufacturers produce recliners with the controls on the left side.
However, instead of customizing your recliners, you can use a recliner that comes with a convenient remote which can easily be controlled with either hand and if you have a manual reclining chair, I would recommend the steps I’ve provided in the DIY way to adapt a recliner for your recovery period.
Conclusion
Hopefully, by following this detailed guide on how to adapt a recliner for right arm surgery and considering my suggestions, you will be able to adapt your recliner with your left arm to meet your specific needs.
I wish you a speedy recovery!
Good luck!
You Can Also Read: